
Showing posts with label Pie. Show all posts
Showing posts with label Pie. Show all posts
Thursday, May 26, 2011
Rhubarb Crumble Pie


Monday, November 23, 2009
The Perfect Pie Dough - Pate Brisee
I have been making pies since the eighth grade - and the most challenging part has always been getting the dough to be the right consistency. I remember my first pie was a complete mess. Once I rolled out the dough and tried to place it in the pan, I ended up having to patch the numerous holes and tears I had created. Over ten years later (whoa!), a lot has changed - including improving my pie making skills. There are a few techniques that can help create a flaky and tender pie crust. I thought I would share my tips since Thanksgiving is tomorrow and every pie is better with homemade dough.
Having a food processor can help immensely, but is not necessary. I like using a food processor because it quickens the process and keeps the dough cooler compared to using your hands or a pastry cutter.
Here is my favorite pie dough recipe - a pate brisee by Martha Stewart. This makes enough for one 9 inch deep dish pie or one 9 inch double crusted pie:
 -2 1/2 cups all-purpose flour, plus more for surface
-1 tablespoon sugar
-1 teaspoon salt
-8 ounces (2 sticks) cold unsalted butter, cut into 1/2-inch cubes
-3 to 4 tablespoons ice water, plus more if needed
My food processor is small, so I can only hold half the amount of the recipe, which I actually like so I end up making two perfectly equal pie dough disks (one for the top and one for the bottom). If you are bad at math, here is the half recipe:
-1 1/4 cups all-purpose flour, plus more for surface
-1 1/2 teaspoons sugar
-1/2 teaspoon salt
-4 ounces (1 stick) of cold, unsalted butter, cut into 1/2-inch cubes
-1 to 2 tablespoons ice water, plus more if needed
Before I begin anything, I like to measure out my chopped butter and flour mixture (salt, sugar, and flour) and place in the freezer to chill for about 5 minutes. It is very important to keep the butter especially chilled, because the cold temperature is what allows the butter to become flaky bits when processed. While chilling the ingredients, create ice water by added a lot of ice and some water - you want it to be very cold. Once everything is chilled well, you can begin making the dough.

 Pulse flour and salt in a food processor until combined. Add butter, and process until mixture resembles coarse meal, about 10 seconds. Do not process for too long, because the motor heats up the dough.


 Now comes the most difficult part of the process. Add your ice water - a little at a time, just a drizzle, then process a bit and see how your dough holds up. You do not want to add too much water, the excess water will create a tougher crust. I usually do not go by actual measurements - there is never an exact amount of water you should add - the amount changes all the time, due to heat and humidity and human error in measuring. Below is an example of too much water, notice how the dough clumps together too easily.
 Example of too much water (above).
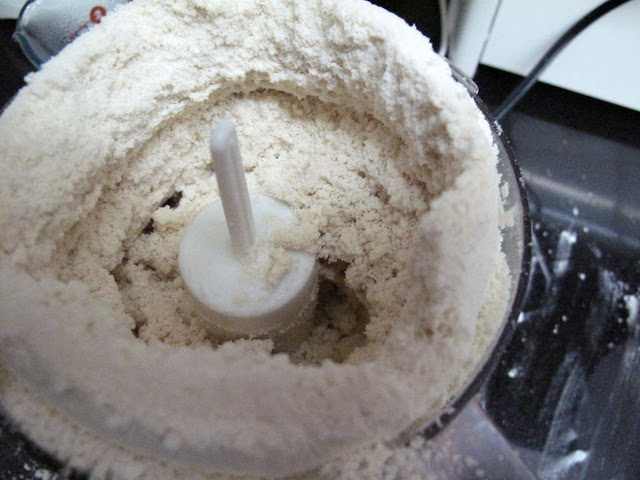 Example of right consistency of dough (crumbly, but holds together).
Having a food processor can help immensely, but is not necessary. I like using a food processor because it quickens the process and keeps the dough cooler compared to using your hands or a pastry cutter.
Here is my favorite pie dough recipe - a pate brisee by Martha Stewart. This makes enough for one 9 inch deep dish pie or one 9 inch double crusted pie:
 -2 1/2 cups all-purpose flour, plus more for surface
-1 tablespoon sugar
-1 teaspoon salt
-8 ounces (2 sticks) cold unsalted butter, cut into 1/2-inch cubes
-3 to 4 tablespoons ice water, plus more if needed
My food processor is small, so I can only hold half the amount of the recipe, which I actually like so I end up making two perfectly equal pie dough disks (one for the top and one for the bottom). If you are bad at math, here is the half recipe:
-1 1/4 cups all-purpose flour, plus more for surface
-1 1/2 teaspoons sugar
-1/2 teaspoon salt
-4 ounces (1 stick) of cold, unsalted butter, cut into 1/2-inch cubes
-1 to 2 tablespoons ice water, plus more if needed
Before I begin anything, I like to measure out my chopped butter and flour mixture (salt, sugar, and flour) and place in the freezer to chill for about 5 minutes. It is very important to keep the butter especially chilled, because the cold temperature is what allows the butter to become flaky bits when processed. While chilling the ingredients, create ice water by added a lot of ice and some water - you want it to be very cold. Once everything is chilled well, you can begin making the dough.

 Pulse flour and salt in a food processor until combined. Add butter, and process until mixture resembles coarse meal, about 10 seconds. Do not process for too long, because the motor heats up the dough.


 Now comes the most difficult part of the process. Add your ice water - a little at a time, just a drizzle, then process a bit and see how your dough holds up. You do not want to add too much water, the excess water will create a tougher crust. I usually do not go by actual measurements - there is never an exact amount of water you should add - the amount changes all the time, due to heat and humidity and human error in measuring. Below is an example of too much water, notice how the dough clumps together too easily.
 Example of too much water (above).
 Example of right consistency of dough (crumbly, but holds together).
Once the dough is just holding together, remove the dough from the food processor and place on the counter. Use your hands to form a disk. If the dough isn't sticking together, just sprinkle a few drops of water on your hands and quickly work in. Don't over work the dough, because the heat of your hands will ruin the butter flakes.
 Now wrap each disk in plastic, and refrigerate for at least 1 hour or up to 3 days (or freeze for up to 1 month; thaw in refrigerator before using).
 Once you are ready to roll out your dough, let it set out for 10 minutes and then sprinkle flour on the counter and on your rolling pin. Rotate your dough circle twenty degrees, every few rolls to prevent sticking. Sliding a frosting spatula underneath to loosen the dough also works. Once the circle is large enough for your pie plate, place rolling pin on edge of the dough and wrap onto the rolling pin and then transfer into the pie plate. I wish I had pictures, but I sadly don't, so click here for Martha Stewart's visuals and instructions. Hope these tips help, and you will try to make your own crust this Thanksgiving.
Wednesday, November 11, 2009
Afton Apple Orchard
A few weeks ago, I flew to Minneapolis to visit my best friend Lisa. Lisa and I are best friends for a lot of reasons - we just get each other, but Lisa and I also have a passion for food. So the weekend was filled with food related things: pulled-pork tacos at a Canadian Tuxedo party, delicious heuvos racheros and corn bread made by Lisa, Arby's curly fries - yum, homemade apple pie, and dinner at Cafe Twenty-Eight.
Minneapolis is a breath of fresh air (literally and figuratively) compared to NYC. After staying with Lisa and her boyfriend Jesse's house, it left me wondering is New York City really that great? Yes and no. Lisa and Jesse have a garden which includes: tomatoes, green beans, squash, herbs (rosemary, basil, oregano, thyme, dill), cucumbers, brussel sprouts, asparagus, rhubarb, beets, carrots, garlic and watermelon. Simply amazing! They even were growing raspberries until a ground hog ate them. And although I can go to the Green Market, it just isn't the same as growing the vegetables yourself.
On Saturday, Lisa and Jesse took me to the Afton Apple Orchard. I have only gone apple picking once before so I was pretty excited. After a long but lovely ride out to the country, we arrived. The great thing about Afton Apple Orchard is that they have a booth where you can sample every apple and then go out to the orchard and pick the ones you like best. Deciding which apple was superior became a contentious debate between all of us. We all love Honeycrisp, but that wasn't available for picking. Three against one decided that the Honey Gold was the best. I was the odd man out and this is why: the Honey Gold apple had floral notes like that of a pear, and if I wanted a pear I would have just bought one, I want an apple to taste like an apple. My personal favorite was the Regent, but we ended up getting the Honey Gold and a bunch of Haralsons for baking. Click here to see Afton's description of each apple. Here are some pictures of our visit:
 Sampling booth.
 Apple Orchard.
 Haralson Apples. Photo taken by Lisa M. Kreidler.
 Sneaky apple eating - Very Illegal. Photo taken by Lisa M. Kreidler.
 The cutest donkey ever!
 Apple donut dessert.
 Apple pie making. Photo taken by A.W.D.
If you live in Minneapolis I definitely recommend stopping by the Afton Apple Orchard, they also have raspberry, blueberries, cherries, peaches, and pumpkins to pick when each are in season. If you don't live in Minneapolis, find an orchard near you - it is a wonderful activity on a dreamy fall day.
Sunday, June 21, 2009
Strawberry Rhubarb Pie
 I made this strawberry rhubarb pie last weekend with my CSA strawberries and rhubarb. Although the flavors were there and the crust was flaky, I was disappointed in the runny filling. I even added tapioca powder as the recipe requested. I am still going to share it with you, because it was eaten up rather quickly. Also, the crust was so easy to make. I have never made a crust with shortening or eggs, and it came together very easily. I think it would be a good crust to try if you are first timer in comparison to just a flour, butter, salt and water crust. Next time I will just scoop some ice cream and call it cobbler :)
Here are the ingredients for Valerie Enters' Grandma's Strawberry Rhubarb Pie:
 Crust:
-2 cups all-purpose flour, plus more for dusting surface
-1/2 cup cake flour
-3 teaspoons confectioners sugar, sifted
-1/2 cup shortening
-1/4 cup butter
-Pinch of salt
-1 egg
-2 teaspoons vinegar
-1/4 cup ice cold water
 Filling:
-2 1/2 cups rhubarb, chopped
-2 1/2 cups strawberries, de-stemmed and cut into larger chunks
-1 1/2 cups sugar
-2 tablespoons minute tapioca
-1 tablespoon all-purpose flour
-1/2 teaspoon lemon juice
-1/2 teaspoon lemon zest
-1/2 teaspoon ground cinnamon
-1 teaspoon vanilla extract
-3 tablespoons butter, cubed small
-1 egg white, beaten with 1 teaspoon of water
-Large granule sugar for sprinkling
Start by making the crust. Begin by combining the flours, sugar, and salt. Add shortening and butter in small pieces. Take a pastry cutter or two knives and blend until well combined and crumbly.


 Whisk egg, vinegar, and water in separate bowl and then pour over flour mixture. Mix until dough comes together without overworking it.

 Divide dough into two halves and wrap in plastic wrap and allow to chill in the refrigerator for at least 30 minutes.

Preheat oven to 425 degrees.
Remove one dough half and dust surface and dough with flour. Roll it out with a rolling pin, making sure the dough is not sticking to the surface.

 Take dough and wrap around rolling pin and carefully lift up and place in pie pan. Gently maneuver the dough so it lays flat against the pan and then take a knife or scissors and cut excess dough off the edges. Place pie pan in the refrigerator to chill.


 Now for the filling, chop rhubarb up into 1/2 inch pieces. De-stem and quarter the strawberries.

 Zest and juice once lemon.
 Combine strawberries, rhubarb, lemon juice, vanilla, sugar, tapioca powder, and cinnamon.
 Pour out over chilled crust. Dot the top of the filling with cubed butter. Brush edges of pie crust with egg wash.

 Roll out second half of dough and drape over top of filling. Tuck under the edges of the excess pie dough and then crimp the edges with a fork.

 Brush the top of crust with egg wash and sprinkle with large granule sugar. Make a few 1 inch slits with a small knife to allow steam to be released. Take a few narrow pieces of foil and wrap on the edges of the crust so it will not burn during baking. I also like to place my pie on a foil lined baking sheet in case the filling bubbles over, it makes for easy clean up.

 Bake at 425 degrees for 15 minutes, then reduce temperature to 375 degrees and bake for the remaining 45-50 minutes or until the crust is golden and the filling is starting to bubble. Remove the foil covering the crust the last 10 minutes of baking.
 Let cool completely before serving.
For original recipe, click here.
Subscribe to:
Posts (Atom)